Welcome to The Beautified Guide to Makeup Brushes!
Here is a complete Guide made to help you identify the many different types of Makeup Brushes as well as their uses. Makeup Brushes not only come in a wide range of sizes, but also different materials, bristle shapes, lengths, and density. Often brands will use numbers on their brushes as oppose to a brief description of what exactly the brush is supposed to be used for. This can lead to confusion and frantic google searching amongst those looking to up-skill their makeup routine. There’s rarely a brush that has one sole purpose and most Artists tend to use the same type brush for different applications. So don’t worry you can’t really go wrong!
Face
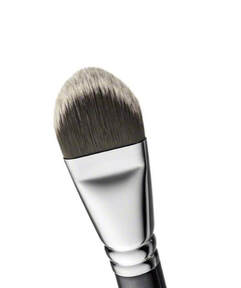
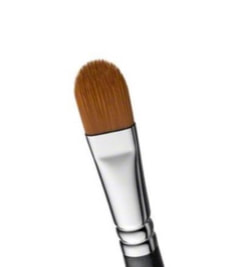
A Classic Foundation BrushAs the name suggests you use this to apply foundation. It works well with liquid and cream Foundations and the curved, flat shape adapts to every area of your face. However I mainly use this brush to apply primers.
|
|
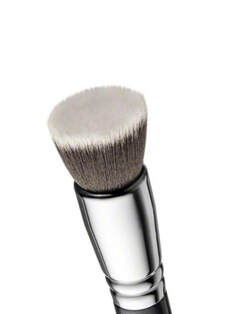
Buffing BrushThis is my favourite brush to use when applying foundations be it liquid, cream or powder. After applying the foundation to the brush blend outwards in circular motions for a flawless finish.
|
|
Powder BrushPerfect for loose or Pressed Powder. Swirl the brush into your powder, gently tap of the excess and diffuse the product onto the skin.
|
|
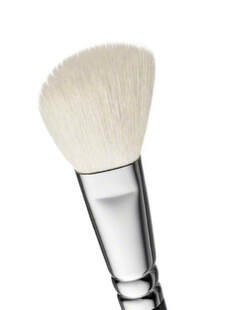
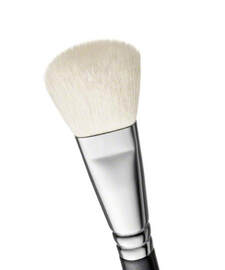
Angled Cheek BrushCan be used for Blush or Bronzer, you can also pinch the bristles and use it for a soft highlight or contour. You can buy angled brushes with either natural synthetic fibres which is perfect for pressed and loose powder or pure synthetic fibres which works better for cream products.
|
|
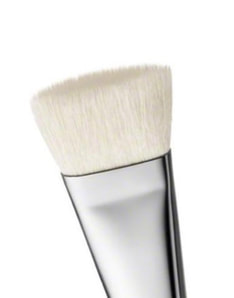
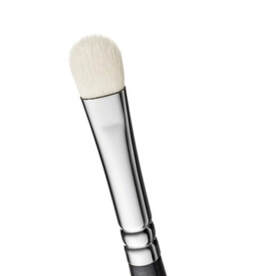
Contour BrushThese flat, square shape brushes are great for applying contour. The unique shape allows you to sculpt the face and the natural fibers in the brush help blend the product out effortlessly.
|
|
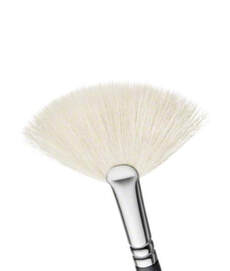
Fan BrushThese are great for applying a wash of highlighter across the cheek bones, down the centre of the nose, along the brow bone and on the Cupid’s bow. It can also be used to separate the lashes and remove any excess mascara. I also love using a fan brush to sweep away any fall down from my eyeshadow application.
|
|
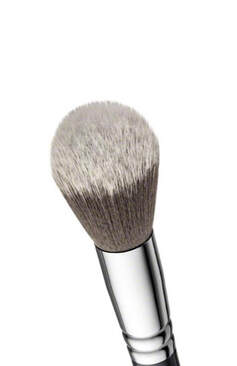
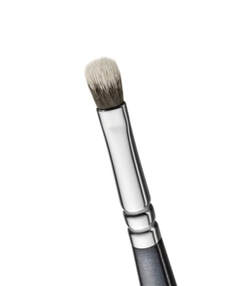
Bronzer BrushThis dome shaped flat head helps deliver a buildable application of powder based products. I favor this shape for Bronzer but it can also be used for blush or powder. It’s one of the most multi-functional brushes.
|
|
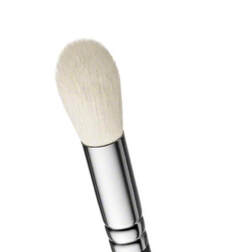
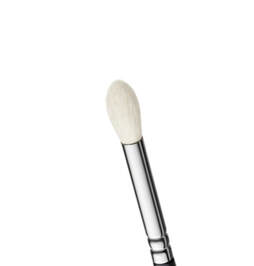
Highlight BrushThis brush has a tapered shape which is perfect for powder highlighter. It can also be used for contour. It gives a soft, natural finish.
|
|
Concealer BrushFlat head concealer brushes are a great tool for covering any imperfections. I personally use this type of brush to sharpen up the underneath of my brow. For under my eyes and for blemishes I prefer a dome shaped concealer brush as I find it easier to work with but it’s totally personal preference. I also like using the flat concealer brush for applying corrector under the eye. It’s also great for applying eyeshadow primer and cream eyeshadow products. If it’s small it can also double as a lip brush.
|
|
Stippling BrushA stippling brush is great for applying powder and liquid formulas to the face. You can use it to apply foundation but watch out for streak marks. Personally I used petite stippling brushes to apply cream bronzers because it can provide an airbrush effect to the skin. The synthetic duo fibre hair in two different lengths achieves buildable coverage with an airbrushed, super-natural finish.
|
|

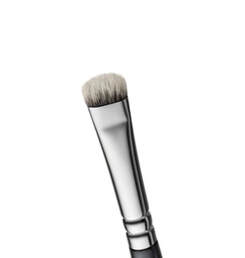
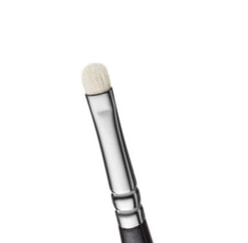
Eye
Blending BrushThese come is a wide variety of shapes and sizes but usually feature a curved brush head made of a natural-synthetic hair blend. Perfect for a wash of shadow across the lid, blending and applying shadow through the crease and can also be handy for contouring your nose. To apply shadow to your crease tap off any excess product on the brush and using circular motions blend the shadow back and forth it a widescreen wiper motion.
|
|
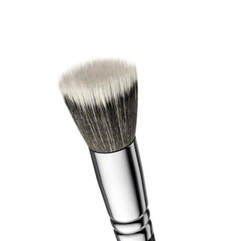
Flat Shader BrushThese usually come in a flat padded shape perfect for applying eyeshadow both cream or liquid across the eyelid or under the lash line. I also love this brush for smoking out a kohl liner.
|
|
Eye Pencil BrushPencil brushes are great for creating detailed looks around the eye area. I love using a pencil brush to create an inner corner highlight as well as smoking out any eye liner. It’s tapered shape and pointed tip can also be useful to spot conceal a blemish on the face. For a more relaxed look sometimes I’ll use a pencil brush to soften out a lipstick to make it appear more like a stain or a gentle wash of colour across the lips.
|
|
Classic Liner BrushI find this brush the easiest when trying to achieve a precise liquid or cream liner look. It also creates a beautiful wing. When applying eyeliner along the lash line use light, directional strokes. You can also wet the brush to transform a powder shadow into a liner. This brush also works well for those who like to apply fake freckles on to the skin. The pointed tip allows you to control where you place the shadow and then gently tap the product in with your finger to achieve a more natural look.
|
|
Angled Liner or Brow BrushFor Liner this brush works brilliantly with powder, liquid and gel formulas. The angled tip creates a precise line and makes for an easy application. An angled liner brush would also be my preferred Brow Brush. It’s great for applying powder and gel products and it’s precise enough that you can really carve out your brows to perfection.
|
|
Smudger BrushThis brush is great when creating a Smokey eye. I tend to use this brush clean, without picking up any excess product instead using it to buff out shadow that I’ve already applied for that smudgy lived in sultry eye look.
|
|
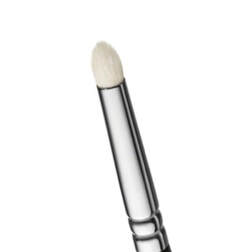
Detailer BrushA detailed brush is for great for precise application. Due to its size and shape it works perfectly to highlight the inner corner of the eye. You can also use this brush to apply eyeshadow precisely where needed for a polished look either above or below the eye and through the crease when trying to achieve a cut crease look. Perfect for detail work.
|
|
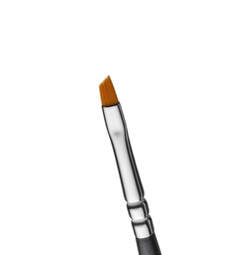
Lip
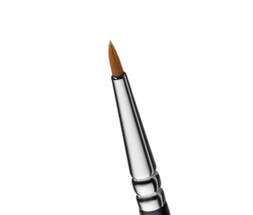
Lip BrushLip brushes work great to define your lip contour and ensure an even distribution of a lip colour especially if it’s a dark shade. Lip brushes usually come with a lid so you can use it on the go. There also perfect for achieving an ombré lip.
|
|
Frequently Asked Brush Questions
Do I need all these Brushes?
If you are a trained professional or a makeup fanatic then investing in a wide variety of makeup brushes can seem like a daunting task. Honestly I still use some of the very first brushes that I purchased over 8 years ago today and they still are in great condition. In my opinion it’s an investment that pays off. However for everyday use this list can 100% be tailored down as a lot of brushes have more than one purpose. In this case I would recommend looking at brush brands who have already created everyday brush sets, it’s a great hack for saving money and you don’t have to worry about finding them all individually. Zoeva, Sigma And Morphe are great examples of brands who have pre made brush sets. If you choose to buy them individually my advice would change depending on what products you use day to day. For example some people favour powders and others creams, for some people their everyday routine consists of a Smokey eye for others a bit of mascara can be all they use.
Generally speaking however these would be my top everyday basic picks:
Face
Eyes
Honestly for everyday use on myself I never reach for a lip brush. This step is totally optional but if you only want the bare minimum I would skip this step completely. If your a fan of a wearing a bright or bold lip everyday then this additional brush might be a big help.
Generally speaking however these would be my top everyday basic picks:
Face
- A brush or sponge to apply your base or foundation either a buffing, stippling or flat headed foundation brush or a beauty blender of choice. Alternatively some people prefer using their hands.
- A powder brush. A medium to large sized powder brush can be used for a multitude of things. You can double up and use the same brush for Powder and Bronzer, you can then pinch the bristles making the head smaller and use it to apply contour, highlight or blush.
Eyes
- One simple dome shape blender brush can help you achieve a wide variety of looks. Depending on how much shadow you wear everyday a dome shaped brush may be enough. If you like a heavier or more advanced look go for a flat shader brush as well as a dome shaped brush. To go a step further again add a detailer brush if you want to achieve a more defined look. Usually two eyeshadow brushes are more than enough for everyday use. You can always use your fingers to help.
- An angled liner brush can double as a way to apply your gel or powder liner as well as your brows. Some people use brow gels so don’t need an extra brush for their brows, but if you prefer a soft powder look or using a brow pomade then an angled liner brush is the way to go! Similarly some people need a brush to apply their liner while others prefer using a liquid liner or pencil liner which means they don’t need this extra brush to complete their look.
Honestly for everyday use on myself I never reach for a lip brush. This step is totally optional but if you only want the bare minimum I would skip this step completely. If your a fan of a wearing a bright or bold lip everyday then this additional brush might be a big help.
What Makeup Brush Brands do you recommend?
Real Techniques are affordable, soft brushes made out of Taklon bristles which are synthetic making the brushes 100% cruelty free. They’re easy to use and easy to clean. My most used Real Techniques Brushes would be The Setting Brush, The Expert Face Brush and my favourite RT product which is the Miracle Complexion Sponge.
Nima Brushes by Irish Makeup Artist Niamh Martin are another great option. They're reasonably priced and the quality is fantastic. I recommend looking at their "Basic Starter Set" or the "Girls on Tour" kit. This is a perfect option for any Makeup Artist looking to build a kit or for any Makeup Lover's looking to add to their collection!
Zoeva Brushes are one of the most used brush brands in my kit. There brushes are bound together as opposed to glued so they hold together incredibly well. They come in a wide range of colours and offer luxurious quality brushes at a more affordable price point. My favourite Zoeva Brushes would be the Luxe Crease Brush, Smokey Shader Brush, Wing Liner Brush, Luxe Sheer Cheek Brush, Luxe Grand Powder Brush and the Petite Stippling Brush.
Mac - Mainly the brands Eye Brushes specifically the 217 which is the first “pro artist” brush that I bought when starting my makeup kit and it’s still in perfect condition to this day. I love their selection of eye brushes however I’m not the biggest fan of some of their face ones. The eye brushes are not the cheapest but are incredibly long lasting so you certainly get value for your money. My favourite Mac Brushes would be the 217, 221, 231 and 239.
Charlotte Tilbury’s Brushes are currently on my shopping list. I’ve used The Hollywood Complexion Brush and loved it. It’s a double ended 2 in 1 multi purpose brush with advanced synthetic fibers. It is very soft and gives an Airbrush finish. I’m definitely intrigued to try more brushes from this brand.
How often should I wash my Brushes?
If you are a professional then you should be washing your used brushes after every client. No exceptions. For your own personal brushes Dermatologists usually recommend washing your brushes especially the ones used for Foundation and Concealer once a week minimum. I’m going to go out on a limb here and say most of us don’t follow that guide, myself included. I wouldn’t wear very heavy makeup day to day and often find myself blending concealer with my fingers so I don’t have many “base brushes” to wash meaning my everyday brushes are mainly used for powder products. For my own powder brushes I use either micellar water to clean them as I go in between washes or The Mac Brush Cleanser whatever I have to hand. A quick dry method to clean your brushes in between uses is very handy especially if you plan on wearing different colours day to day. But it’s still important that we wash or deep cleanse our brushes regularly especially as I’ve mentioned our foundation and concealer brushes because bacteria prefers wet conditions making it easier to accumulate micro organisms than Dry Powder Brushes. A more general rule of thumb is every 2-4 weeks. Taking Good care of your brushes can definitely make them last longer.
How do I wash my Brushes?
Over the years new brush washing gadgets have popped up some I’ve tried others I’ve skipped but I’ve always went back to simple hand washing time and time again. In my opinion you can use many household products to clean your brushes from Shampoo to regular dishwashing liquid. As Bobbi Brown said “these brushes are going to be used on your face, the cleaner they are the better”. Frequent brush cleanses can also keep your skin in better condition. There are cleansers specifically made for cleaning your brushes but I’ve tried many and can honestly say regular soap and water does the same job. I begin by washing the bristles with lukewarm water. I then place a drop of whatever product I’m using into a clean hand. I begin to gently swirl the brush into the palm of my hand massaging the bristles as I go. Next I rinse the bristles thoroughly and gently squeeze out any excess water or product. Depending on what brush your cleaning you may need to repeat those steps as some can be trickier to clean particularly stubborn foundation brushes. When the brush is finished washing I reshape the bristles into their original form then I let them dry naturally. I tend to either angle the brushes slightly to stop the water or soap from breaking down the glue that may hold the bristles in place inside the ferrule or place the brush head over the edge of a counter when drying. Avoid drying your brushes on a towel and don’t stand them up straight right after washing without giving them adequate time to dry out first.
Can I clean my Makeup Brushes in the Washing Machine?
No, the heat of your washing machine will likely break down the glue that holds the bristles in place. Hand washing your brushes is the best, most effective method
Where should I store my brushes?
I keep my brushes in a cool and dry place in a separate bag to my Makeup. Avoid storing your brushes in the Bathroom which can be warm, damp and can host plenty of bacteria.